Custom Field Definitions
Aeon includes a fixed set of fields on every request, user, and activity, but most institutions need to track something Aeon doesn't have a column for — a research purpose, a grant code, a security clearance level. Custom field definitions are how you add those fields. You define a field once here, and from then on it appears on every record of that type, ready to be filled in.
Defining a custom field is a configuration task you do up front, not part of daily processing. Once the field exists, staff see and edit it on the request, user, or activity form (you control exactly where it shows up using the Form Designer), and you can reference it in routing rules and email templates. This page covers creating, editing, and removing the definitions themselves.
- You need to capture a piece of information Aeon has no built-in field for — add a new definition for the right record type.
- You want to rename a custom field's on-screen label, or correct its data type.
- You're cleaning up a custom field your institution no longer uses and want to remove it.
Working with custom field definitions requires the Data & Fields configuration capability. Without it, the Custom Fields section doesn't appear in the Customization Manager, and opening it directly shows "You don't have permission to access this customization section."
Where to find it
Open the Customization Manager and, under the Data & Fields group, choose Custom Fields. (The navigation item is labelled Custom Fields; the page it opens is headed Custom Field Definitions.) You can also jump straight there from the command palette, or from the Search customizations… box on the Customization Manager home page.
The page is split into three tabs across the top — Transaction, User, and Activity — one for each kind of record a custom field can attach to. Each tab is a self-contained list of the fields defined for that record type, with a list of fields on the left and a detail panel on the right.
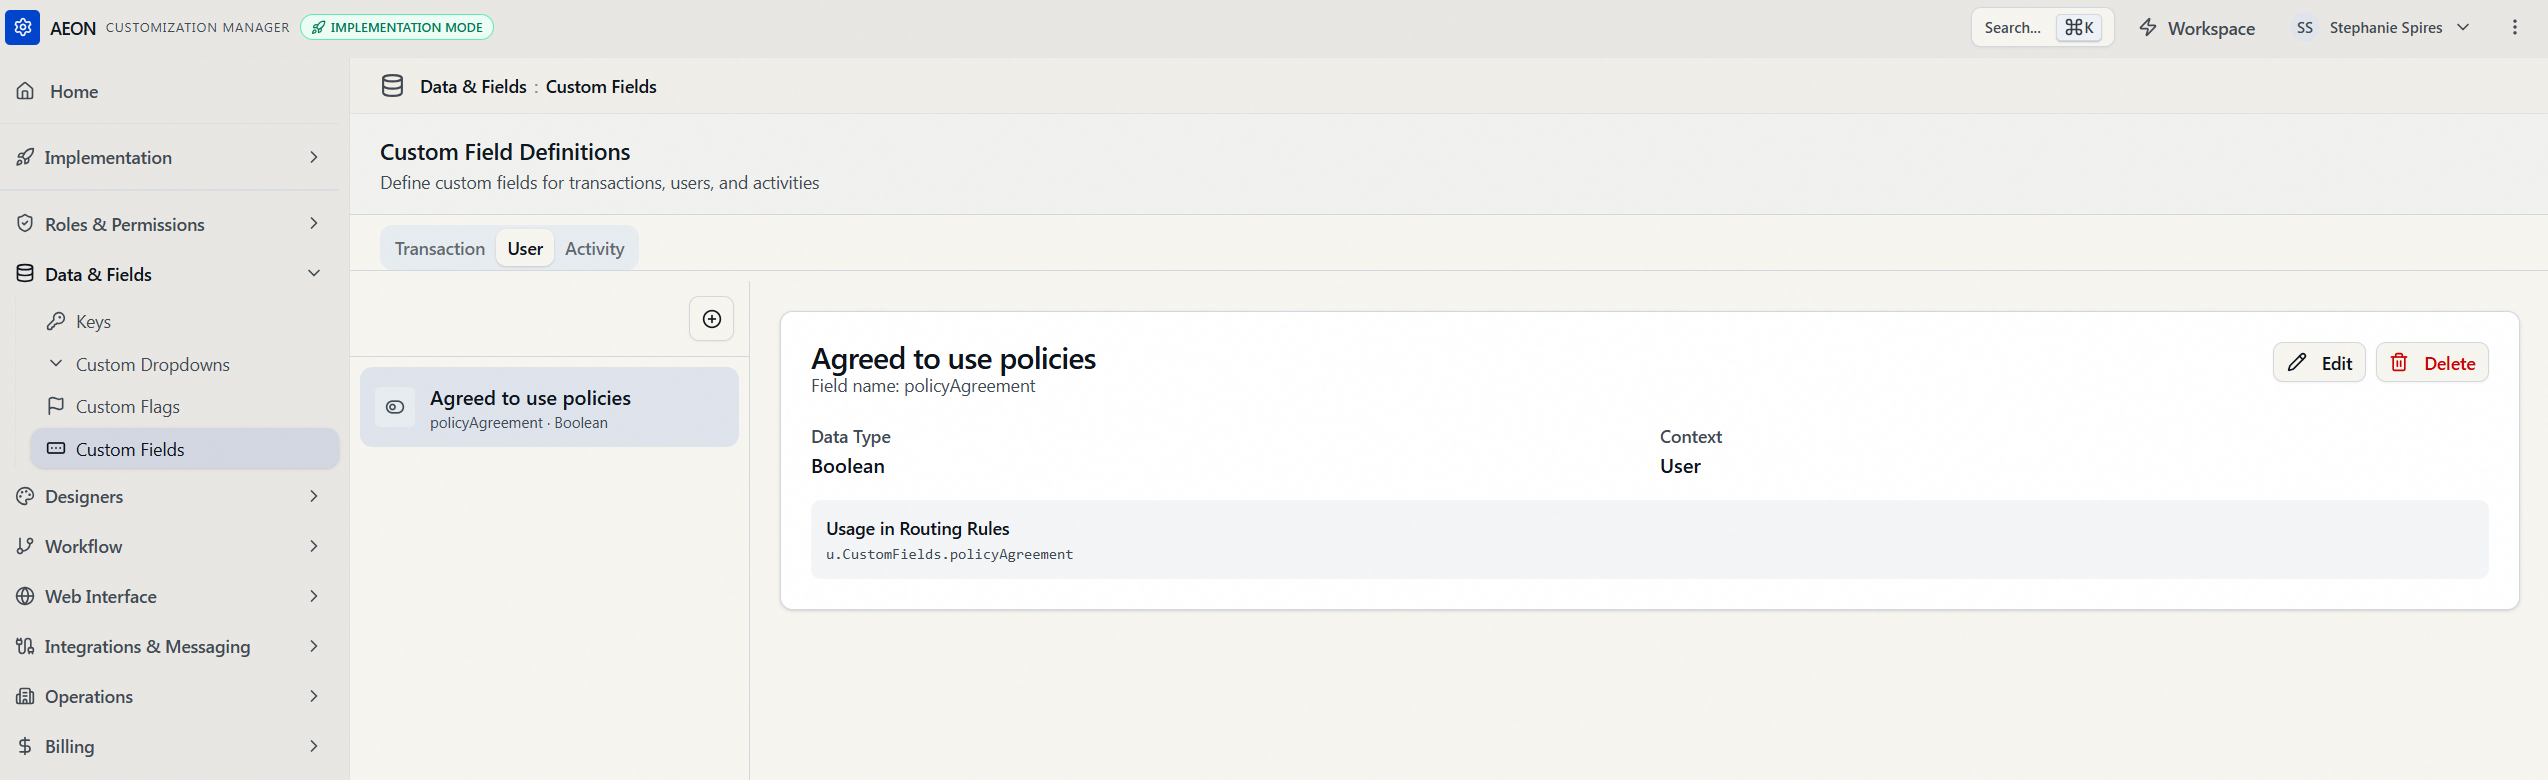
The first tab is labelled Transaction because that's the underlying record type for a request. A custom field created on the Transaction tab appears on every request.
Creating a custom field
- Select the tab for the record type you want the field on — Transaction (requests), User, or Activity.
- Click the + (add) button at the top of the field list. The Create Custom Field dialog opens.
- Fill in the three fields:
- Short Name — the internal name Aeon uses for the field in routing rules, email tags, and queries. This is not what staff see on the form. For example,
ResearchPurpose. - Display Label — the human-readable label that appears next to the field on the form, for example Research Purpose.
- Data Type — what kind of value the field holds (see the table below). Defaults to Short Text.
- Short Name — the internal name Aeon uses for the field in routing rules, email tags, and queries. This is not what staff see on the form. For example,
- Click Save.
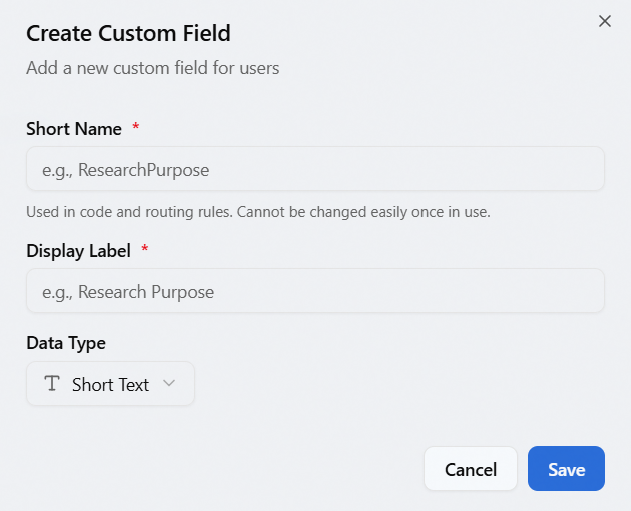
The new field is created for the tab you were on and is immediately selected so you can review it. From this point it's available on every record of that type, starting out blank on each one.
A field's record type comes from the tab you're on when you click + — it isn't a choice inside the Create dialog. If you create a field while the User tab is active, it's a User field. To add the same field to requests as well, switch to the Transaction tab and create it again there.
Data types
The Data Type controls how the value is stored and how the field is presented for editing:
| Data type (on screen) | Stores |
|---|---|
| Short Text | A single line of text. |
| Long Text | A larger, multi-line text box for notes-style content. |
| Integer | A whole number. |
| Date | A calendar date. |
| Date & Time | A date together with a time. |
| Boolean | A true/false (checkbox) value. |
| Custom Dropdown | A value chosen from a list. The list comes from the Custom Dropdowns table — the dropdown's group name must match this field's Short Name. |
A Custom Dropdown field doesn't define its own options here. It pulls them from the Custom Dropdowns table, matched by name — the field shows the options of the dropdown group whose name exactly matches its Short Name. You can set these up in either order (create the field first, or the dropdown group first); they link up as soon as the names match. Because the match is on the Short Name, the group name must itself be a valid short name — start with a letter, and use only letters, numbers, and underscores. Until a matching group exists, the field's detail panel shows "No options defined. Add options in the Custom Dropdowns table."
Short name rules
The short name is used in internal queries and routing expressions, so Aeon enforces a few rules:
- It must start with a letter and contain only letters, numbers, and underscores — no spaces or punctuation. If it doesn't, the dialog flags it: "Must start with a letter and contain only letters, numbers, and underscores."
- It must be unique within that record type. You can't have two Transaction fields both named
GrantCode, but a Transaction field and a User field could share the name. If you reuse a name on the same record type, the save is rejected: "A custom field with short name '…' already exists for … context."
Avoid reusing the name of an existing Aeon column (like ItemTitle). A short name that collides with a built-in field makes it harder to tell which field you're referencing in routing rules and when troubleshooting. The dialog also notes the short name "Cannot be changed easily once in use" — choose it deliberately.
Viewing and editing a field
Click any field in the list to open it in the detail panel. The panel shows the field's Display Label and Short Name at the top (as Field name), its Data Type and Context, the dropdown options if it's a Custom Dropdown, and a ready-to-copy snippet showing how to reference the field in routing rules. Transaction fields use a t. prefix (for example t.CustomFields.ResearchPurpose); User and Activity fields use a u. prefix (for example u.CustomFields.MemberLevel).
To change a field:
- Select it in the list.
- Click Edit in the detail panel. The Edit Custom Field dialog opens with the current values.
- Update the Short Name, Display Label, or Data Type and click Save.
The same short-name rules apply on edit. Note that the field's record type (context) is fixed once created — Edit doesn't let you move a field from, say, User to Transaction.
The short name is what routing rules, email template tags, and the Form Designer use to find the field. If you rename it, anything that referred to the old name will no longer resolve until you update those references too. Renaming the display label is safe — only the on-screen wording changes.
Deleting a field
- Select the field in the list.
- Click Delete in the detail panel.
- Confirm in the Delete Custom Field? dialog.
Aeon refuses to delete a definition that still has values stored against it. If staff have already filled the field in on any record, the delete is blocked with a message like "Cannot delete custom field definition '…' — it has N existing value(s). Delete all values first…" Clear those values first, then delete the definition. For an unused field (no values anywhere), deletion goes through and the definition is removed permanently.
A User custom field's values are erased when that user is anonymized, but Transaction and Activity values are not. Don't store personally identifying information in Transaction or Activity custom fields — it won't be cleared by anonymization.
After you create a field
Defining the field is only the first step — by itself it exists but may not be visible on the form. To put it in front of staff, add it to the relevant layout in the Form Designer (Request Form, User Form, or Activity Form). From there you can also reference the field by its short name in routing rules and email templates.