The Queues Table
Queues are how requests move through Aeon. Every request sits in exactly one queue — Awaiting Request Processing, Item Checked Out, Request Finished, and so on — and routing a request just moves it from one queue to the next. Aeon includes a fixed set of default status queues that drive the standard reading-room and photoduplication workflow; you don't create those, and you can't delete them.
What you can do here is add custom queues. A custom queue is one you create for your own processing needs (say, a separate holding queue for a particular collection or workflow). Every custom queue is built on top of a default queue: it picks up the default queue's state code, which is what tells Aeon how the queue behaves in the workflow. The custom queue gives you a queue of your own name and grouping, but it acts exactly like the default queue it was based on.
The Queues table lives in the Customization Manager, under the Workflow section of the navigation — open it at Customizations → Workflow → Queues. The same list is the source of truth for the queues you see when routing requests and on the dashboard.
- You need a processing queue that the defaults don't cover — create a custom queue based on whichever default state matches the behavior you want.
- You want queues grouped together in the routing menu and dashboard — set a shared Menu group on them.
- A custom queue is no longer used — mark it inactive (keeps it for statistics) or delete it (if nothing references it).
- You want an alternate name for a queue on the patron-facing web pages — set its Display name.
The Queues section is gated by the Workflow configuration capability. Without it, Queues doesn't appear in the Customization Manager's Workflow group, and opening the page directly shows "You don't have permission to access this customization section." With the capability you can both view the queues and create, edit, and delete them — and those write actions are enforced on the server as well, so the gate holds even for direct API access.
Getting into the Customization Manager at all also requires access to at least one configuration section; a staff member with none sees "You don't have access to any configuration sections." See Editing a Role: Configuration Capabilities for how the Workflow capability is granted.
How the table is organized
The page opens on two tabs:
- Active — queues currently usable for processing. The count in the tab label reflects the current filters.
- Inactive — queues that have been turned off. Inactive queues can't be used to route new requests, but they're kept for statistics and history.
Each queue appears as a card. The queue's name shows in bold; if it has a separate display name (the optional web-facing label), that appears as a smaller line beneath — most queues don't have one, so the card just shows the name. On the right are badges for the queue's type (Transaction or Photoduplication, always shown), its menu group (only when it belongs to one), and a System badge on the default queues, followed by an Edit button. Cards are grouped under their menu group headings, with anything ungrouped listed below.
Across the top, filter chips narrow the list:
| Filter | What it does |
|---|---|
| System | Show only the built-in default queues. |
| Custom | Show only queues you've created. |
| Transaction | Show only Transaction-type queues. |
| Photoduplication | Show only Photoduplication-type queues. |
| Menu Group | Pick one or more menu groups to show. |
Click Reset to clear all filters at once.
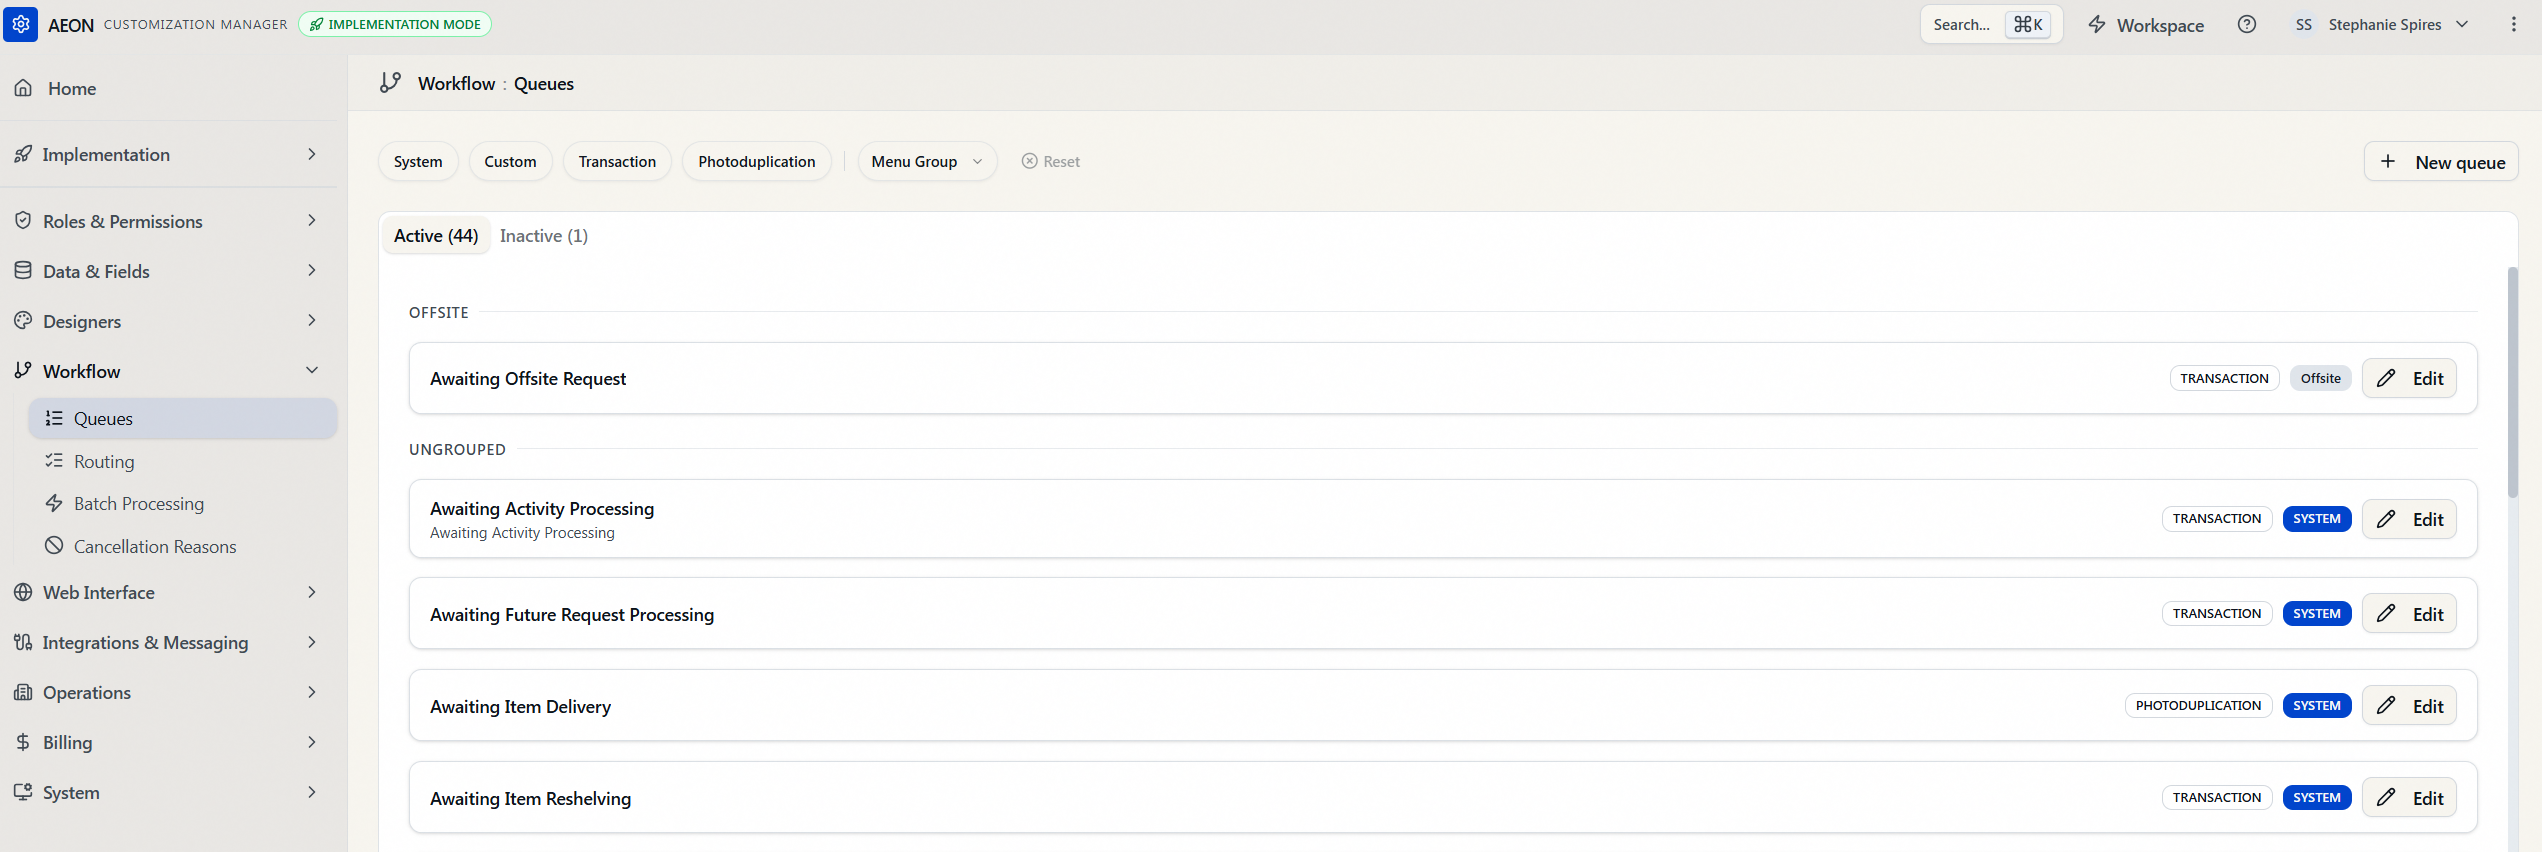
Fields on a queue
When you create or edit a queue, these are the fields you'll set:
| Field | Description |
|---|---|
| Queue name | The queue's name. This is what staff see in routing menus and on the dashboard. Required; up to 50 characters. |
| Display name | An optional alternate name shown on the patron-facing web pages, if you want it to read differently from the queue name. |
| State code | The default queue this queue's behavior is based on. Choosing a state code is what determines how the queue acts in the workflow. Required. On default (System) queues this is fixed and can't be changed. |
| Queue type | Transaction or Photoduplication. You don't set this directly — it's derived from the state code you pick and shown for confirmation. |
| Menu group | An optional grouping label. Queues sharing a menu group are grouped together in the routing menu and on the dashboard. Type a new name or pick an existing one from the suggestions. |
| Include in request limits | When checked, requests in this queue count toward your users' request limits. |
The state code is the heart of how a queue behaves. Each default queue has a built-in state code (for example, Awaiting Request Processing is state code 35), and when you base a custom queue on it, the custom queue inherits that same state code — and therefore the same workflow behavior and the same queue type. The dropdown shows each option as its name plus its type, e.g. Awaiting Request Processing (Transaction), so you can see what you're inheriting. If you later rename the default queue, custom queues built on it still follow its behavior — the link is the state code, not the name.
Creating a custom queue
- Go to Customizations → Workflow → Queues.
- Click New queue (top right). A blank queue card opens in edit mode on the Active tab.
- Enter a Queue name — for example,
Awaiting Manuscripts Processing. - Optionally set a Display name for the web pages.
- Choose a State code from the dropdown. Pick the default queue whose workflow behavior you want this queue to copy — for example, Awaiting Request Processing (Transaction). The Queue type below updates to match.
- Optionally type a Menu group to group this queue with others in the routing menu and dashboard.
- Check Include in request limits if requests sitting in this queue should count toward user request limits.
- Click Save. Aeon confirms with "Queue created successfully." New custom queues start out active.
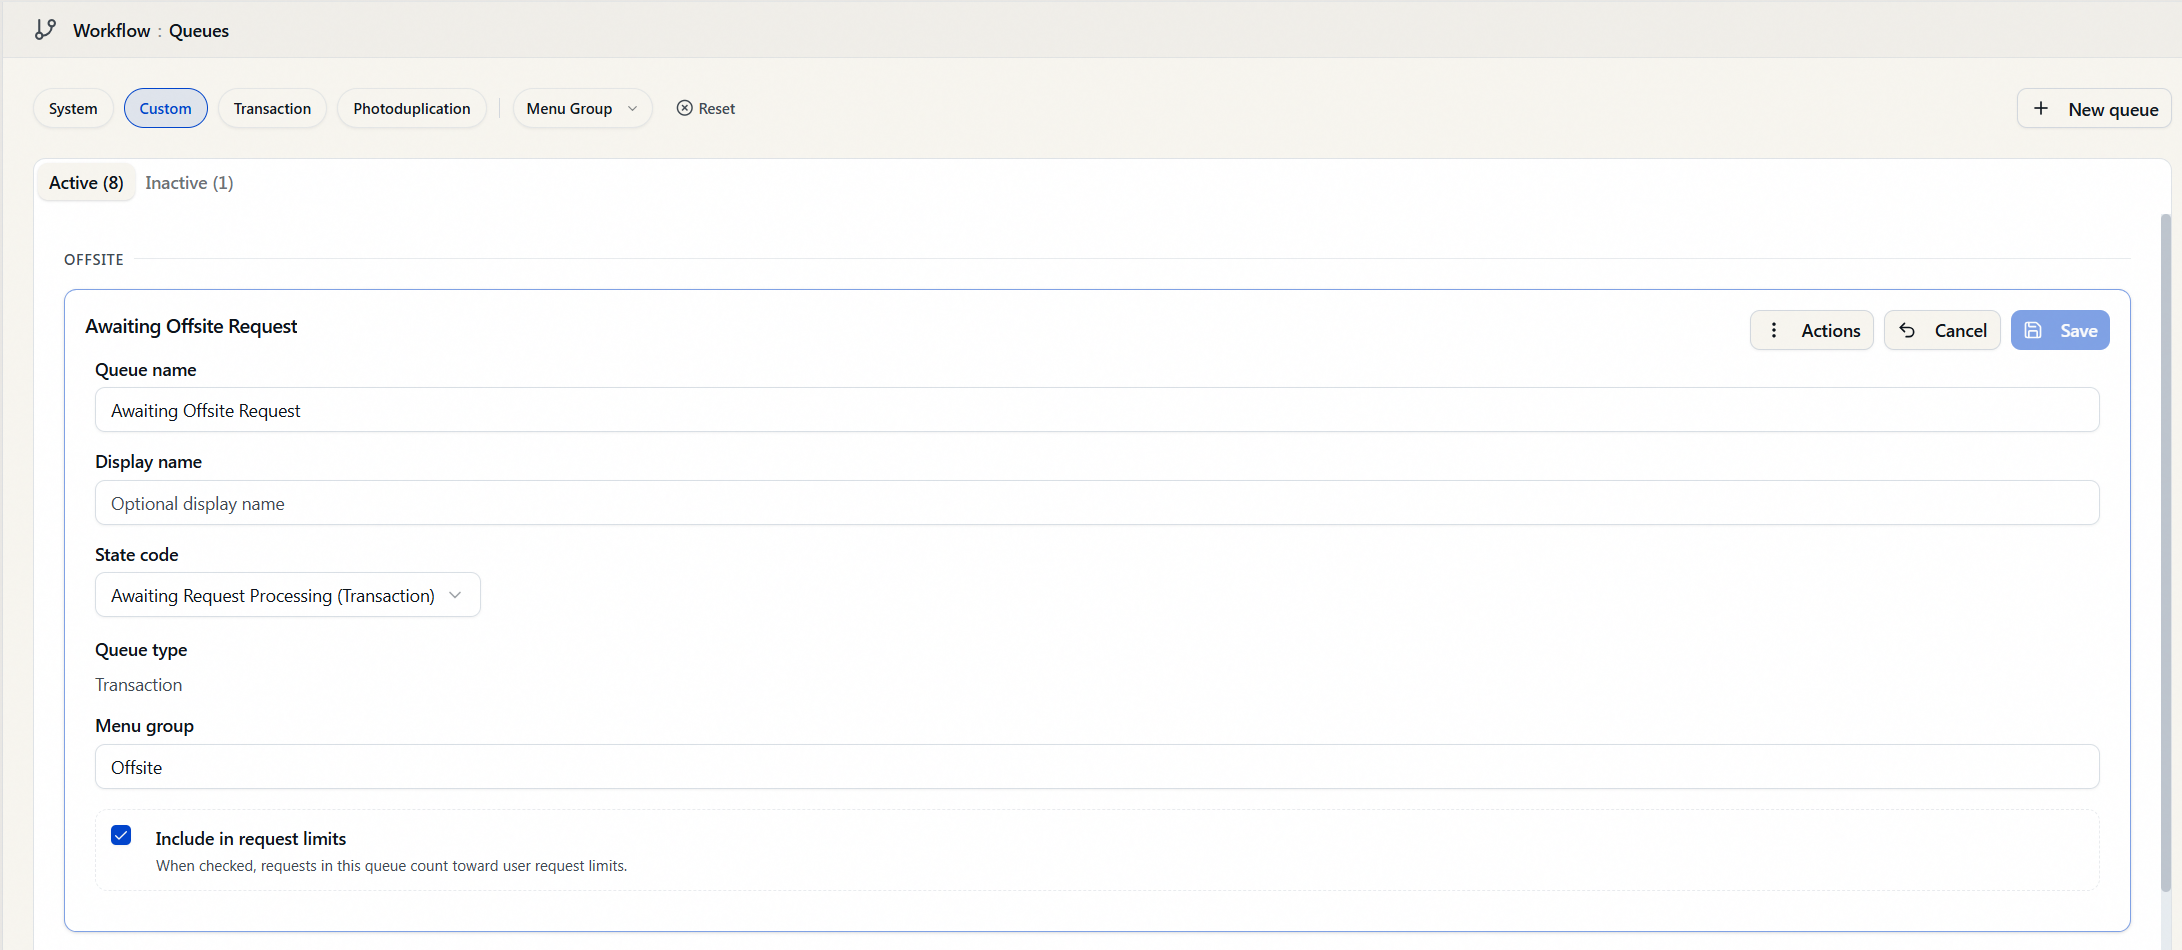
While a queue card is open for editing, Ctrl+S (or ⌘S on a Mac) saves, and Alt+A (⌥A on a Mac) opens the Actions menu.
Editing a queue
- Find the queue and click Edit on its card (or right-click the card and choose Edit).
- Change the fields you need. On default (System) queues, State code and the active/inactive setting are locked — you can still adjust the queue name, display name, menu group, and request-limit setting.
- Click Save. Aeon confirms with "Queue updated."
If you start editing a different queue while you have unsaved changes, Aeon stops you with a Discard unsaved changes? prompt — choose Stay here to go back, or Discard changes to switch.
You can rename a default queue, but it's generally not recommended. The name you set becomes the queue's name everywhere — staff routing menus, the dashboard, and the patron web pages — and any custom queues based on it will display the new name as their "state" too, which makes it harder to tell at a glance which default workflow a queue is using. The state code never changes, so the underlying behavior is safe, but the labeling can get confusing. If you rename a default queue, keep a note of its original name and state code.
Turning a queue off (Mark inactive) vs. deleting it
Default queues can be neither deleted nor made inactive — they're permanent. For custom queues you have two ways to retire one, and Aeon decides which are available based on whether anything still references the queue.
To start, open the Actions menu on the queue card (or right-click the card) and choose Delete. Aeon checks the queue's usage before doing anything and opens the Delete queue dialog with the appropriate options:
- Mark inactive — always available. The queue moves to the Inactive tab and can no longer be used for new routing, but all its history and statistics are preserved. This is the safe default when a queue has been used.
- Delete queue — available only when nothing references the queue. It's removed permanently.
- Delete and cascade — offered when the only things referencing the queue are routing rules, email routing, or batch processes. Choosing this removes the queue and those dependent configuration records. Aeon spells out what will be removed in the dialog, for example: "Deleting this queue will remove related routing rules, email routing."
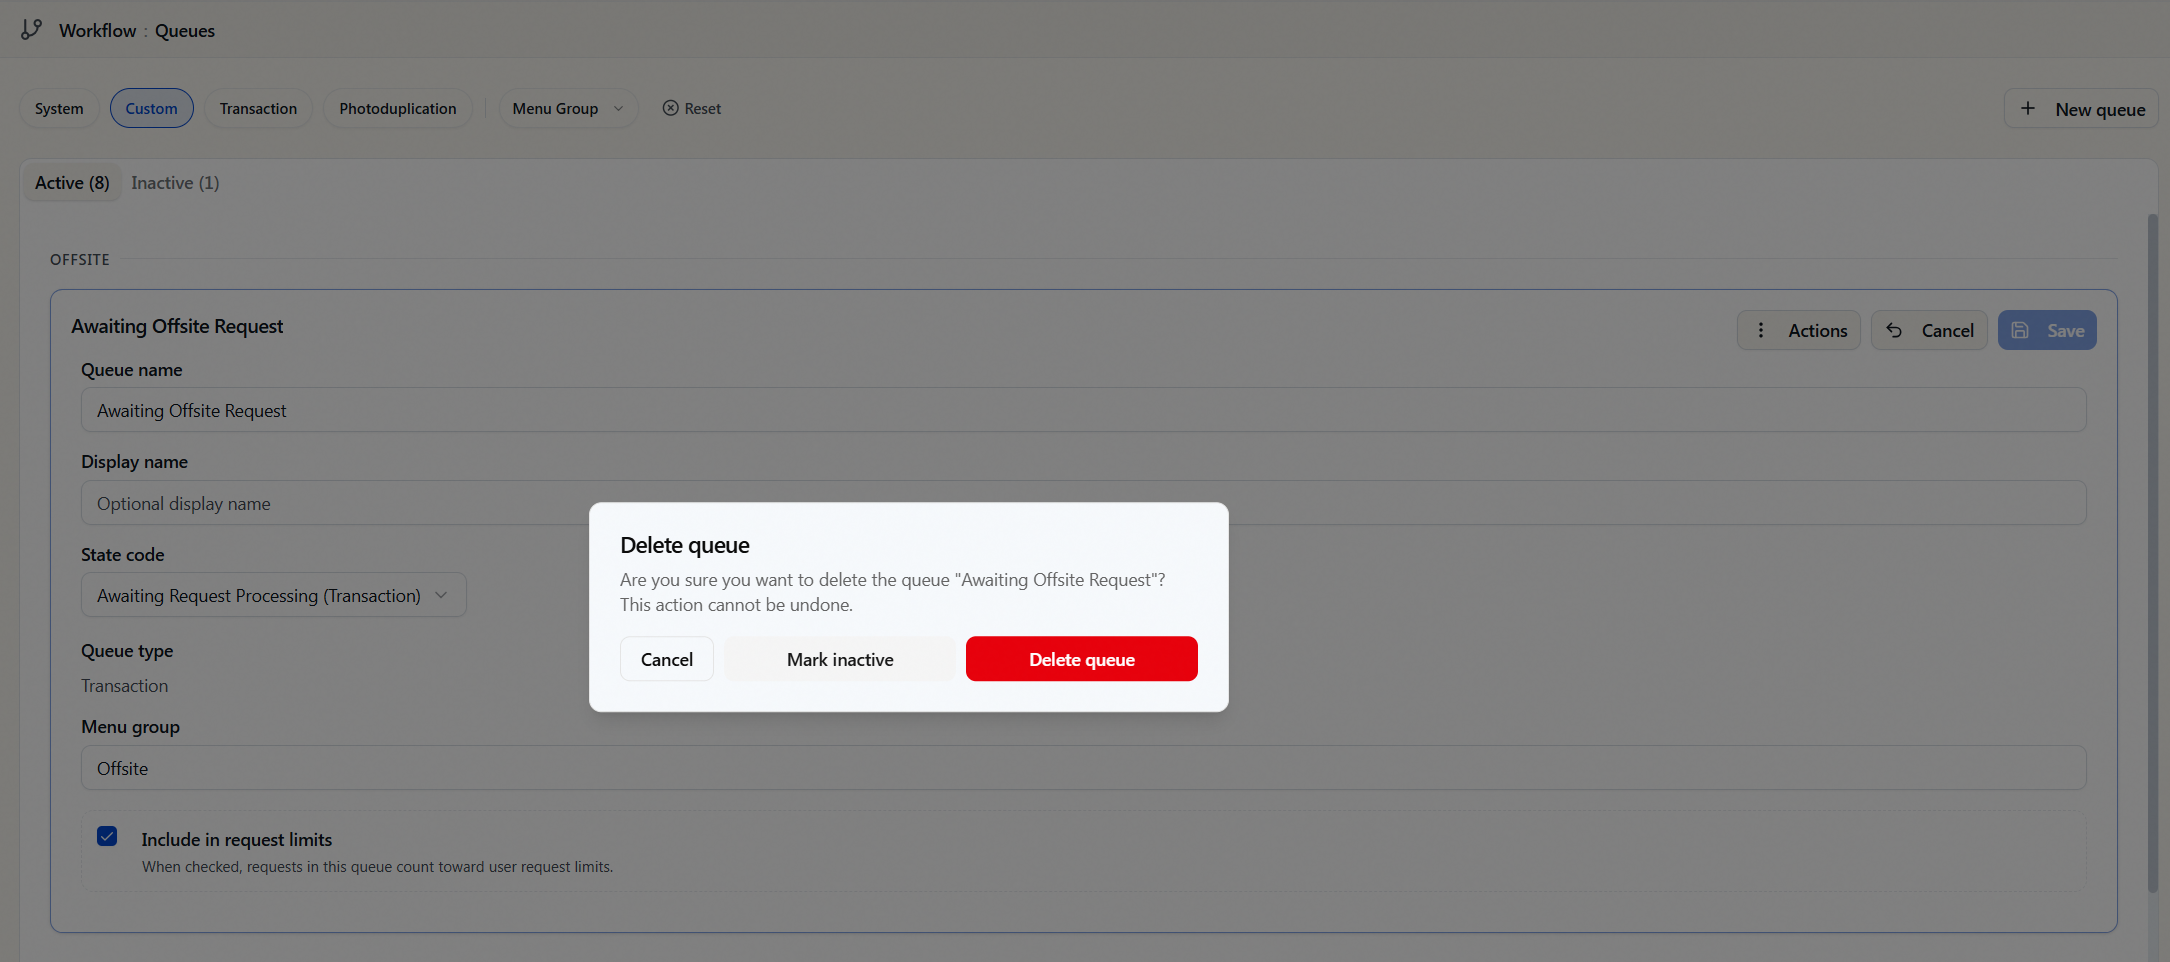
If a custom queue has ever been used in a transaction or appears in tracking history, Aeon will not delete it — even with cascade. The dialog explains: "This queue has been used in transactions or tracking records and cannot be deleted. Mark it inactive instead." This protects the integrity of your request history. Mark inactive is the right move in that case.
A few default queues worth knowing
Most default queues map directly to a recognizable workflow step. A couple behave specially:
- Web Request Created is a transitory state stamped on every request the moment it's created, just to record its entry in the database. Requests should never linger here. If you ever see a live request stuck in Web Request Created, contact support@atlas-sys.com with the transaction number.
- Imported From Legacy System is used when migrating requests in from another system.
The full set of default queues, their state codes, and whether each is a Transaction or Photoduplication queue is fixed by Aeon and visible in the table itself — filter by System to review them all.