Bulk Selection and Bulk Actions
Most of the time you work one request at a time: click a row, it opens in the detail pane, you process it. But plenty of tasks are the same for a whole stack of requests — route forty new requests to the same queue, flag everything that needs a second look, print call slips for a researcher's pull list. For those, Aeon lets you select many requests at once and apply a single action to all of them.
Selecting a request for bulk action is different from opening it. Opening shows one request in the detail pane. Selecting checks a box next to one or more rows; a floating action bar then slides up from the bottom of the list with everything you can do to that set. The two don't interfere — you can keep a request open in the detail pane while you check off a batch in the list.
- A batch of requests all need the same thing — the same queue, the same flag, the same print job.
- You want to cancel, clone, or reassign several requests in one pass instead of opening each one.
- You're cleaning up a queue and want to clear flags or move a group of requests together.
Bulk selection is available anywhere requests are shown in a list: any queue, any category (Active, Awaiting, On Hold, and so on), any flag view, and the global Search results. Selecting works the same across all of them.
Selecting requests
Every request row — in both the card list and the grid — has a checkbox on its left edge. Click the checkbox on each request you want; checking a box never opens the request, so the detail pane is unaffected.
In the card list, two click shortcuts let you build a selection faster:
- Ctrl-click (or Cmd-click on a Mac) a card toggles it in or out of the selection without opening it — handy for grabbing a scattered handful.
- Shift-click for a range. Check the first request you want (or click its card to select it), then hold Shift and click the body of a card further down — every request between the two is added at once. Aim for the card body: a shift-click on the checkbox itself only toggles that one row.
To grab the whole list, use the Select all checkbox in the stats bar just above the list (next to the item count); in the grid, the same control is the select-all checkbox in the column header. Click it to select every request in the current view, and again to clear them. When only some rows are checked, the box shows a checkmark on its plain (unfilled) background — as opposed to the filled, highlighted checkmark you get once the whole list is selected. The N of M selected count beside it is the clearest signal of how much of the list you've grabbed.
The Ctrl/Cmd-click and Shift-click range shortcuts work in the card list. In the grid, build your selection with the row checkboxes and the header Select all — the modifier-click shortcuts aren't available there.
Select all reaches every request loaded in the list — including rows scrolled out of view, not just the few visible on screen. It also respects the filters and search you've applied: if you've filtered a queue down to a handful of requests, Select all checks exactly that handful, not the whole queue.
As soon as at least one request is checked, the stats bar shows a running count — for example, 12 of 340 selected — and the bulk-action bar appears at the bottom of the list.
Clearing the selection
You can drop the selection at any time by:
- clicking the X (Clear selection) at the left end of the bulk-action bar,
- clicking any row normally (a plain, unmodified click selects that one request, opens it, and clears the batch), or
- switching to a different queue, category, or flag — changing views always starts you with a clean slate.
The selection also clears automatically once a bulk action finishes, so you're ready for the next batch.
The bulk-action bar
When you have requests selected, a bar slides up across the bottom of the list. The left end shows N selected and the X to clear; the rest is a row of action buttons. Buttons with a small chevron (˅) open a short menu when clicked.
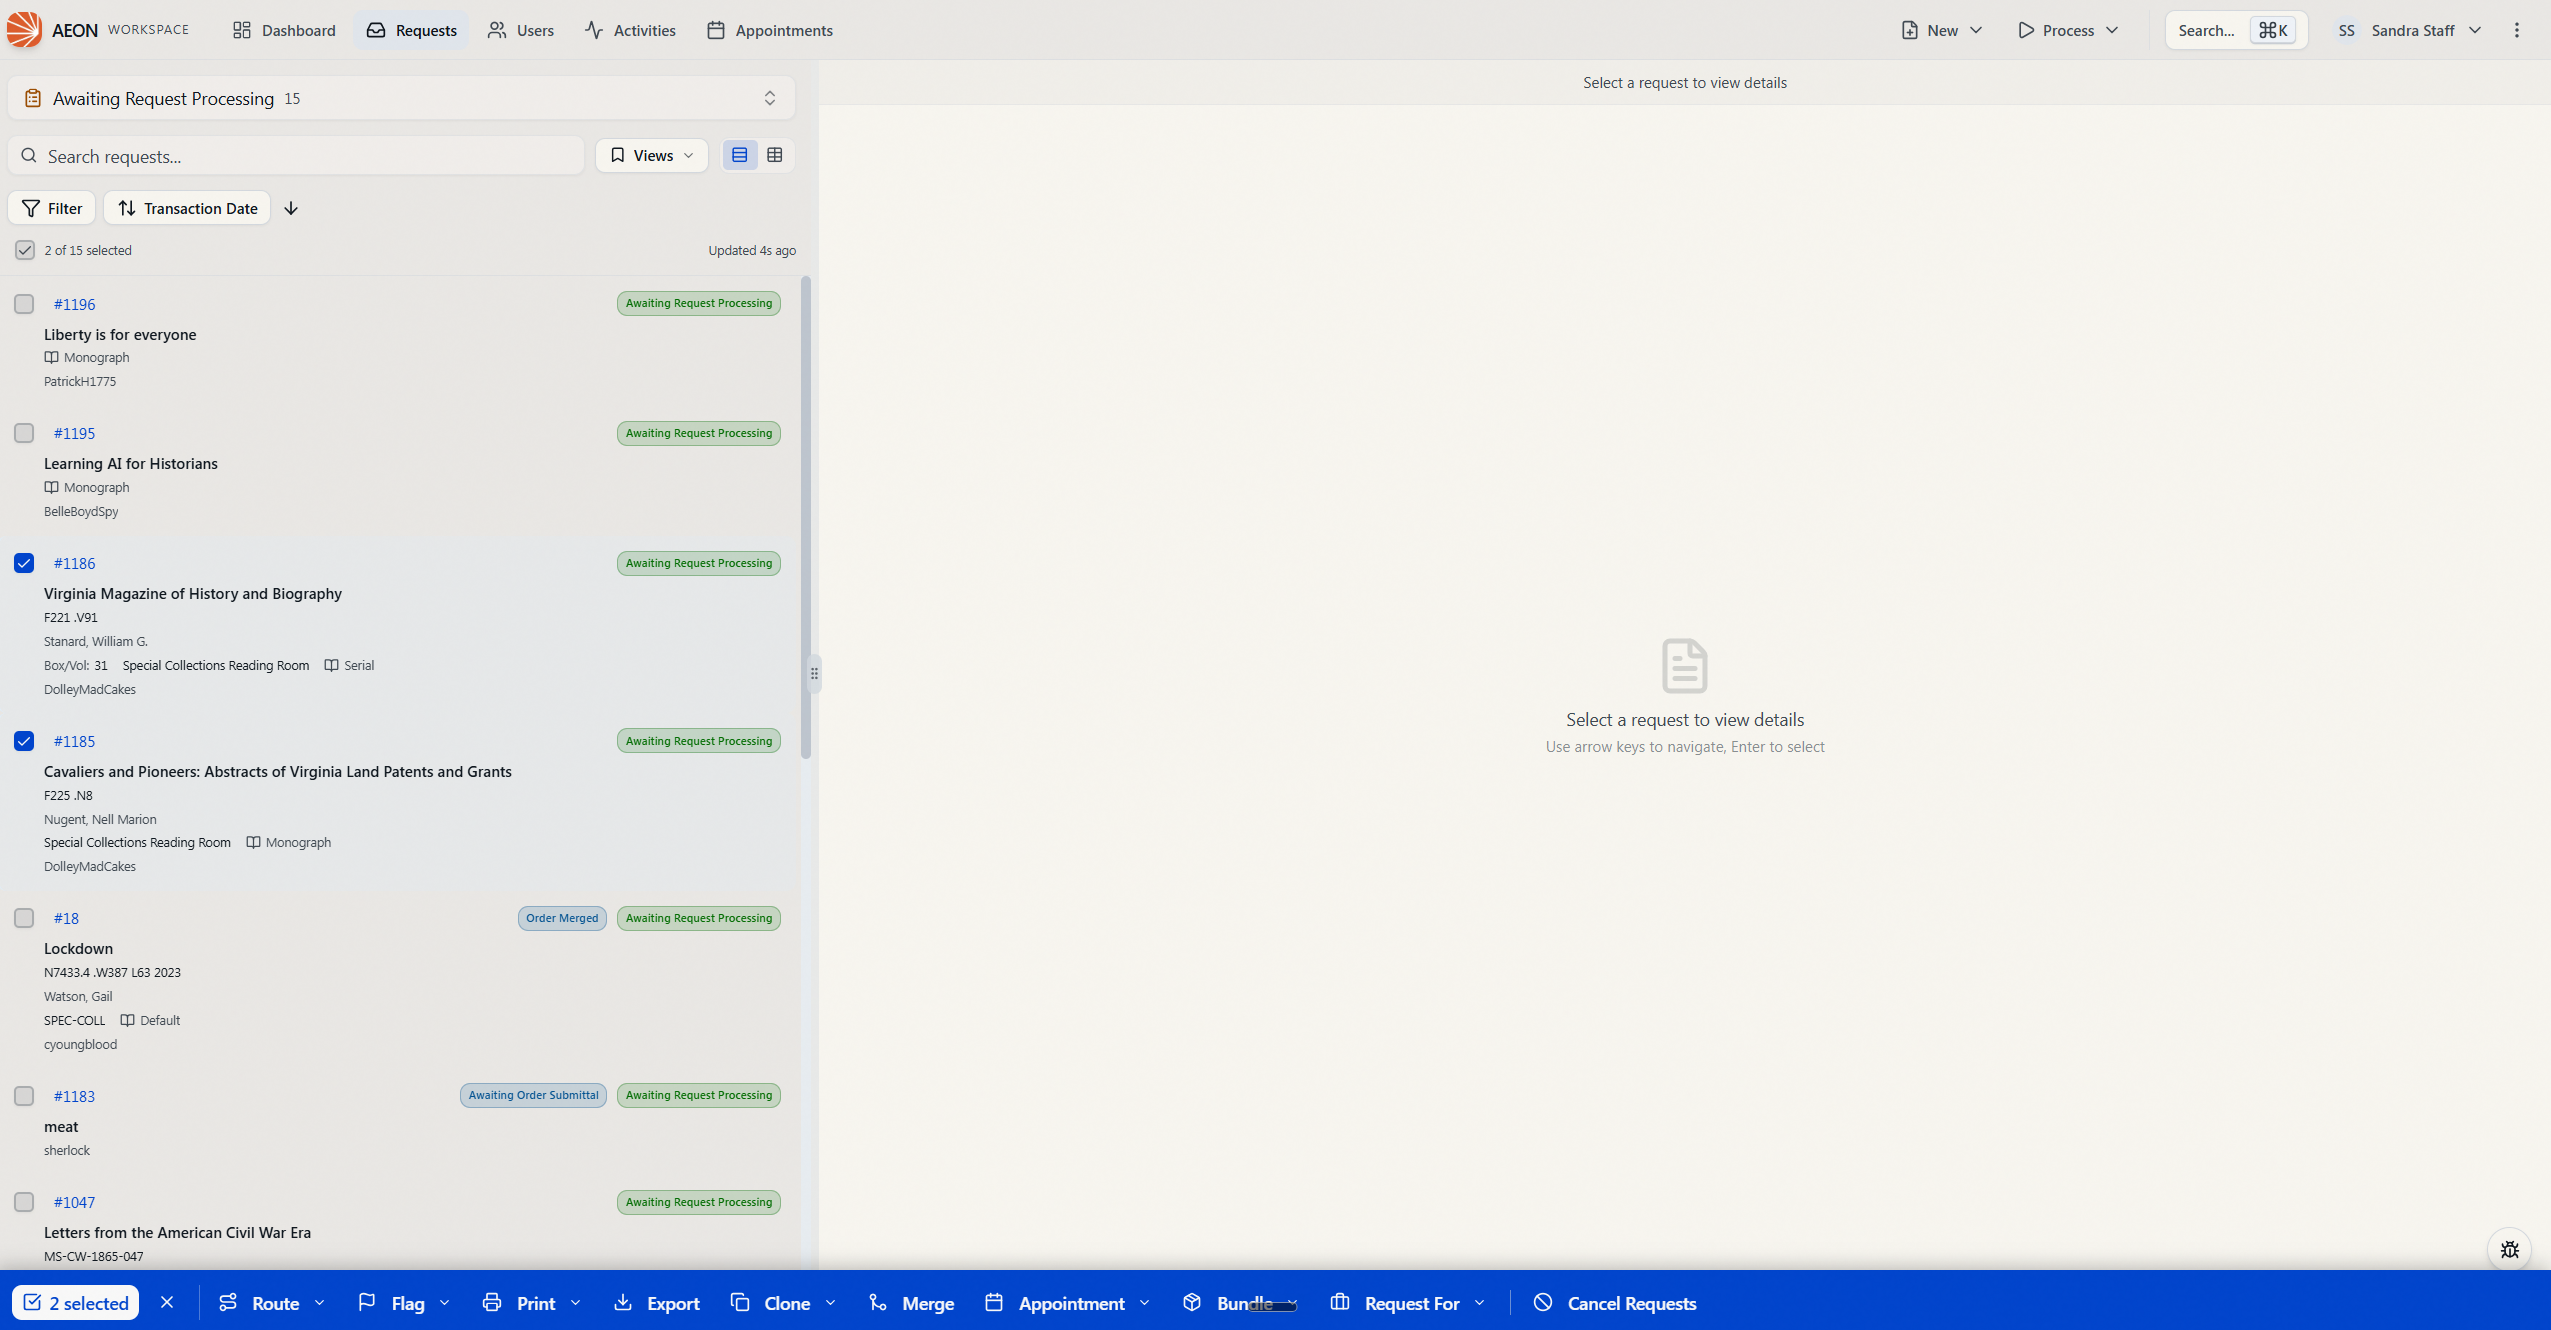
| Button | What it does |
|---|---|
| Route | Send all selected requests to a queue. The menu is a searchable list of available queues, grouped by their menu group; pick one and confirm. |
| Flag | Add or remove a request flag across the whole selection. The menu has an Add Flag list and a Remove Flag list. |
| Print for the whole set — Request, Callslip, Invoice, or Digitization Request. | |
| Export | Export the selected requests' data to a file. |
| Clone | Clone the requests (same owner) or Clone to User… to copy them onto another patron. |
| Merge | Combine the selected requests into one. Enabled only when you've picked 2 or more requests that all belong to the same user. |
| Appointment | Assign to Appointment… or Remove Appointment for the selection. |
| Bundle | Assign to Bundle…, or remove the requests from a bundle you choose. |
| Request For | Assign to Activity…, Assign to Researcher…, or Clear Association for the set. |
| Cancel Requests | Cancel every selected request. As the one destructive action, it's set off from the other buttons by a divider (it sits at the far end). |
Most actions open a confirmation or details dialog first, so you get a chance to review the set before anything happens. Two act immediately, though: picking a flag from the Flag menu adds or removes it across the whole selection at once, and plain Clone clones the set right away and then shows you the results.
A typical flow: routing a batch
- Open a queue — say, Awaiting Request Processing.
- Check the requests you want to move, or use Select all.
- In the bulk-action bar, click Route.
- Pick the destination queue from the menu (for example, Awaiting Reading Room Visit).
- Confirm in the dialog. Aeon routes every selected request and reports the result.
If they all route cleanly, you get a brief confirmation such as "Routed 12 requests to Awaiting Reading Room Visit." If some can't be routed, Aeon shows a results dialog listing which requests succeeded and which failed, with the reason for each — the rest of the batch still goes through.
Bulk actions process each request independently. If a few in the batch can't be completed — one is locked by a coworker, another fails a billing check — the action still applies to all the others, and you get a results dialog spelling out exactly which ones didn't make it. You don't have to redo the whole batch.
Actions that need the requests to match
A few actions only make sense when the selected requests have something in common, and the bar enforces that — though in two different ways:
- Merge requires at least 2 requests, and they must all belong to the same user. Until both are true the button stays disabled; hovering it explains why ("All selected requests must belong to the same user" or "Select at least 2 requests to merge").
- Assign to Appointment… (under Appointment) requires a single common user. When the selection spans more than one patron, this item is greyed out and a note below it reads "Requests must belong to the same user." (Remove Appointment has no such restriction.)
- The Request For options work only when every selected request belongs to the same user. If your selection spans more than one patron, choosing Assign to Activity…, Assign to Researcher…, or Clear Association won't open the dialog — Aeon flags that the requests must all belong to the same user. Narrow the selection to a single patron and try again.
Permissions
The action buttons you see depend on your role. Aeon shows the buttons but disables the ones your role can't perform:
- Route, Merge, and Cancel Requests require Full access to Requests.
- Flag, Clone, Bundle, and Request For require Edit access to Requests.
- Appointment actions require Edit access to Appointments.
- Print requires at least View access to Requests; Export requires View access to Reports/Export.
If a button is greyed out, your role doesn't grant that operation. An administrator can adjust role capabilities in the Customization Manager.