Using the Grid and Saved Views
Aeon 7 gives every list you work in a spreadsheet-style Grid alongside the familiar cards. Instead of paging through cards one screen at a time, you can see many records at once, arrange the columns that matter to you, sort and filter at a glance, and then save that layout as a named View you can switch between, share with a colleague, pin to a queue, or — with designer access — set as a starting point for your whole team.
The Grid is the same component everywhere it appears, so once you learn it on your request queues you already know it on users and activities. This page covers the shared behavior in one place; the individual queue, user, and activity pages point back here for the details.
- You want to scan and sort many records at once, the way you would in a spreadsheet.
- You keep re-applying the same columns, sort order, and filters, and you'd rather save that setup once.
- You want a particular queue to open with a particular layout every time.
- You're an administrator who wants to give the whole team a consistent starting layout.
- Request queues, Users, and Activities each offer a Cards / Grid toggle — you choose which view you want.
- Custom Search always renders its results in the grid; it has no card view. See Custom Search and Saved Views.
Switching between Cards and Grid
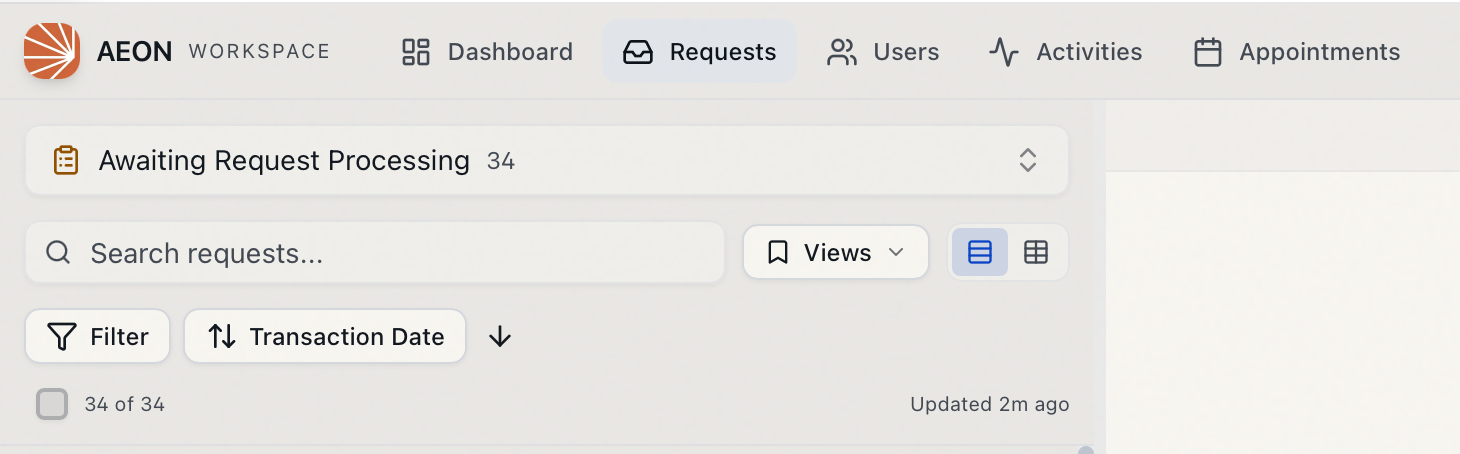
Above each list is a small two-button toggle. One button shows the card view (the stacked record cards you're used to); the other shows the grid. They're icon-only buttons — hover to confirm which is which: the tooltips read "Card view" and "Grid view". Click the grid icon to switch the list to the spreadsheet layout, or the card icon to switch back. Aeon remembers your choice for that list, so it opens the same way next time.
There's also a second way to switch, tied to how much room the list has. The list and the open record share a resizable split: drag the divider to widen the list past about halfway and it flips to Grid on its own, and narrow it back below the midpoint to return to Cards. The Grid also needs a reasonably wide window: shrink the browser down to about tablet width or narrower and the list switches to Cards on its own, since there's no longer room for a useful set of columns. In short, the Grid appears when there's room for it and steps aside when there isn't.
Working with columns like a spreadsheet
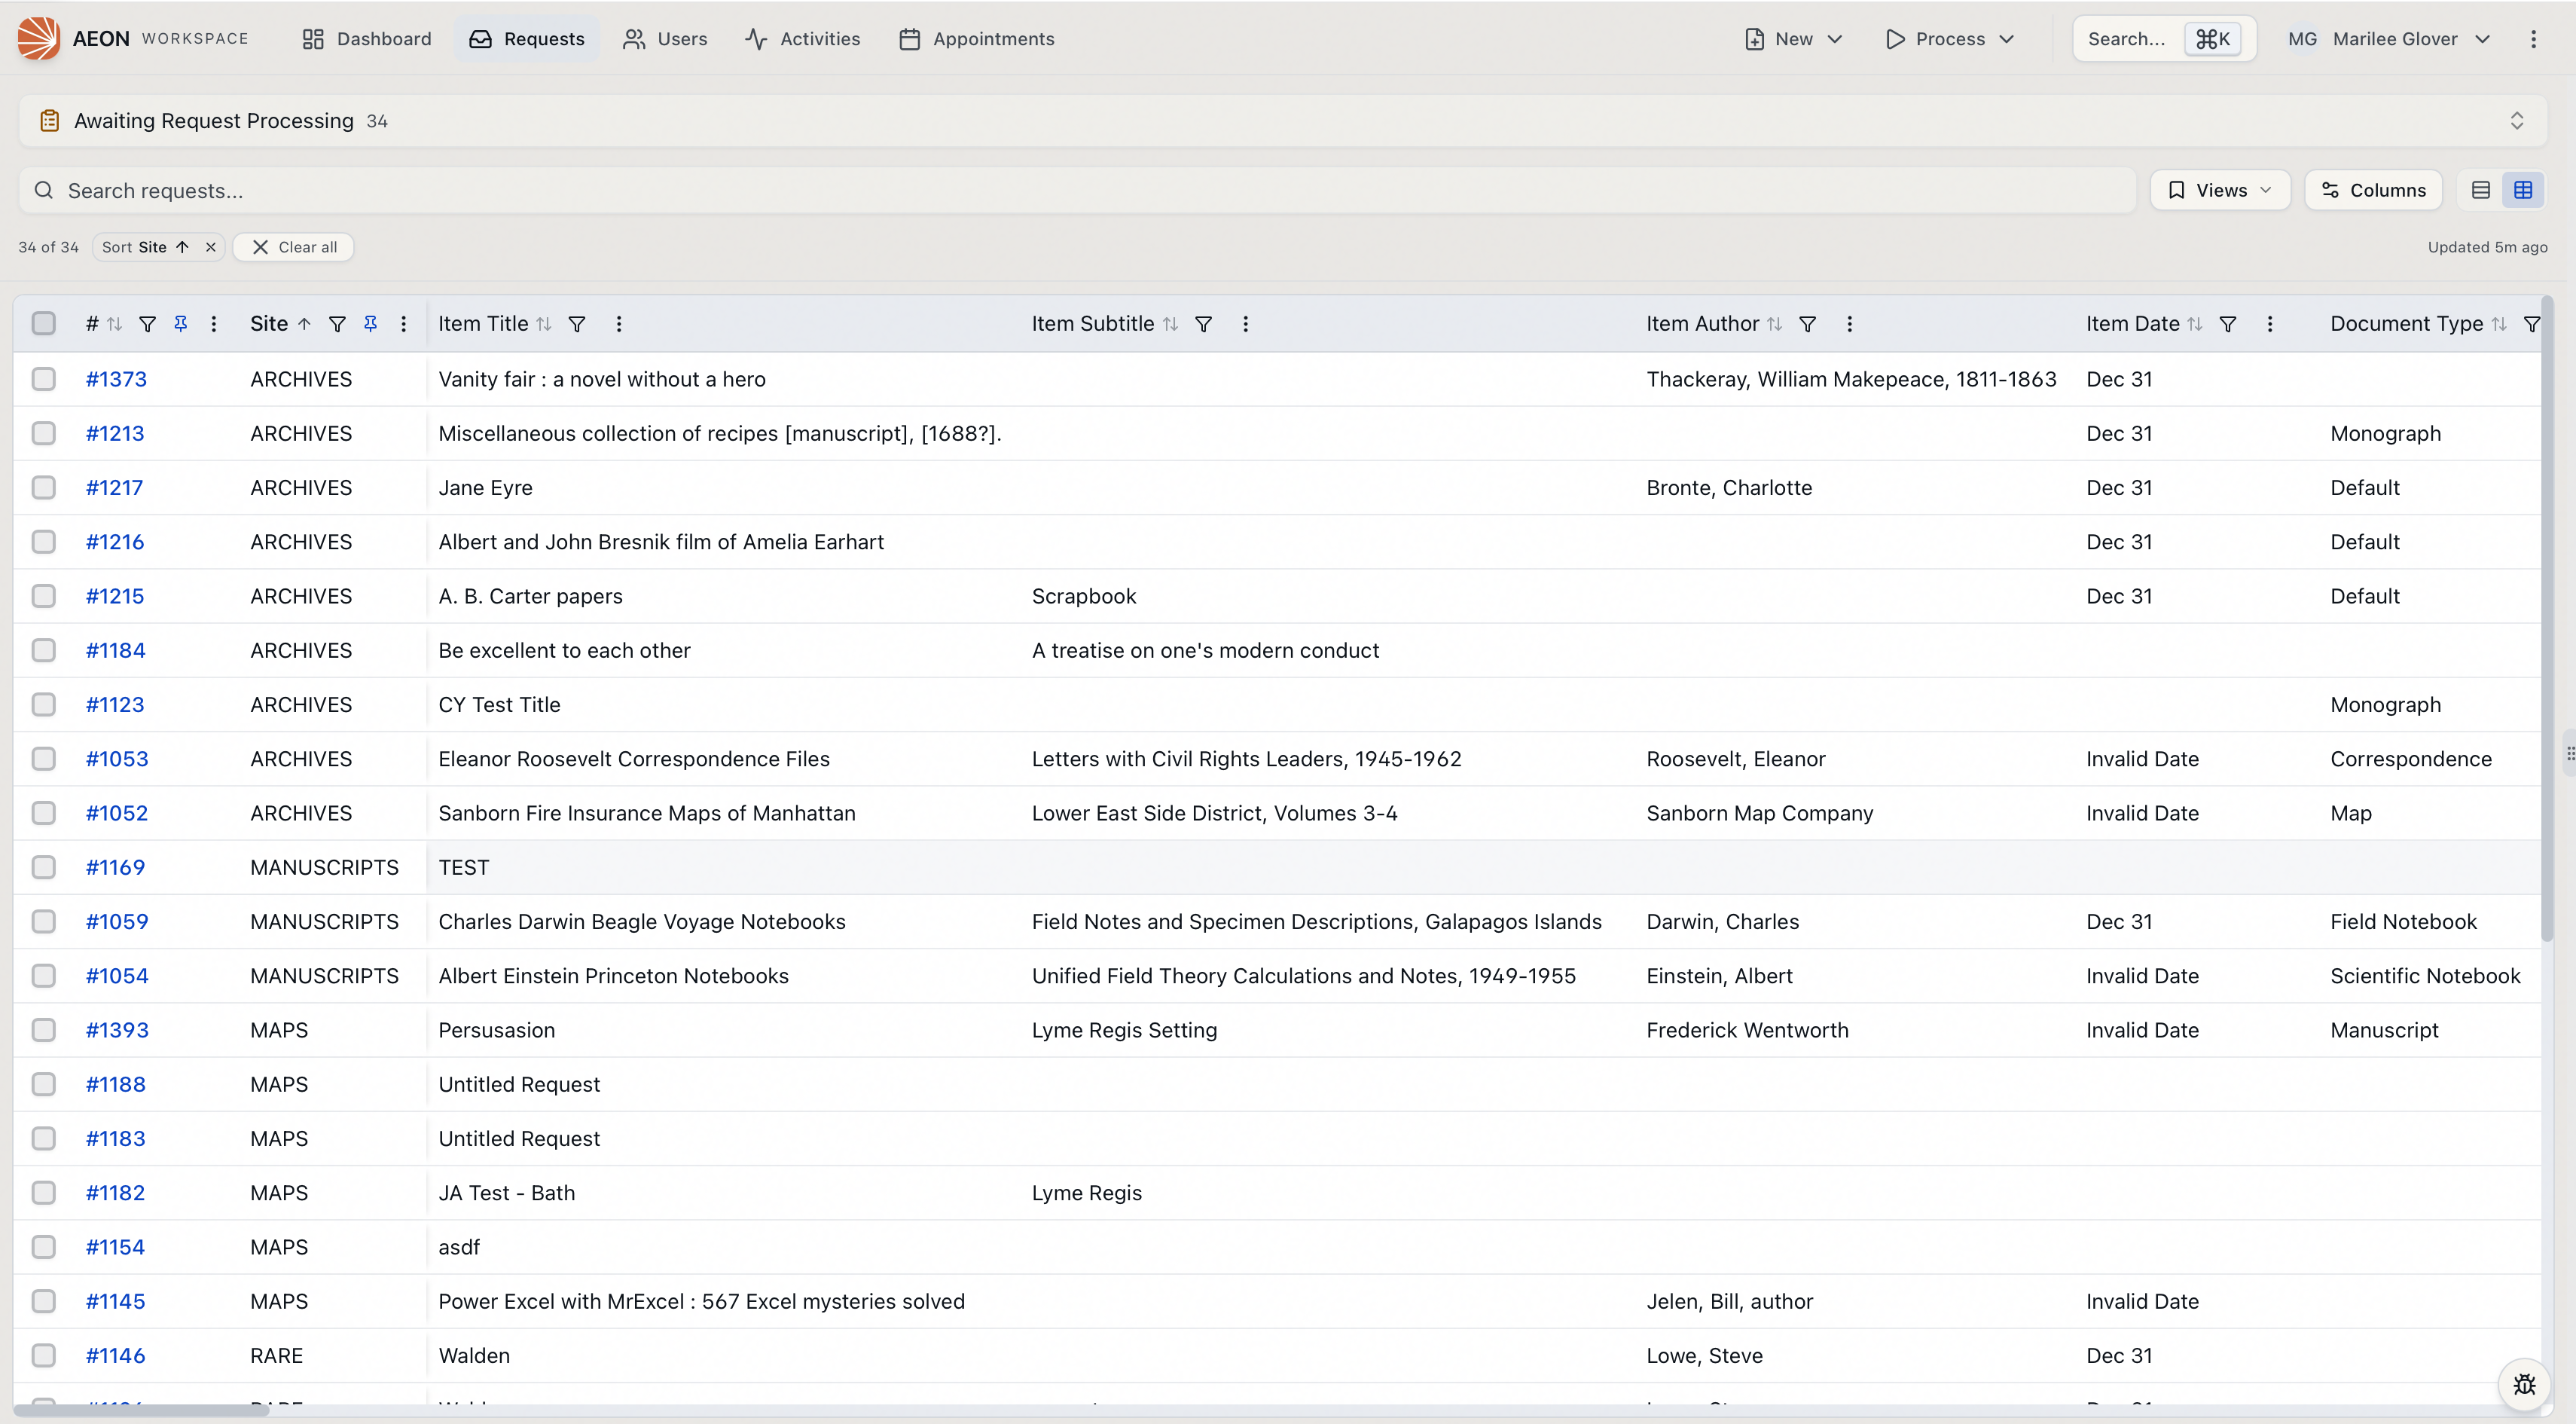
Once you're in the Grid, the columns behave the way you'd expect of a spreadsheet:
- Sort — click a column header to sort by it; click again to reverse. Number columns sort numerically, not as text.
- Resize — drag a column's edge to widen or narrow it, or double-click the divider to auto-fit the column to its contents.
- Reorder — drag a column header left or right to put the fields you care about where you want them.
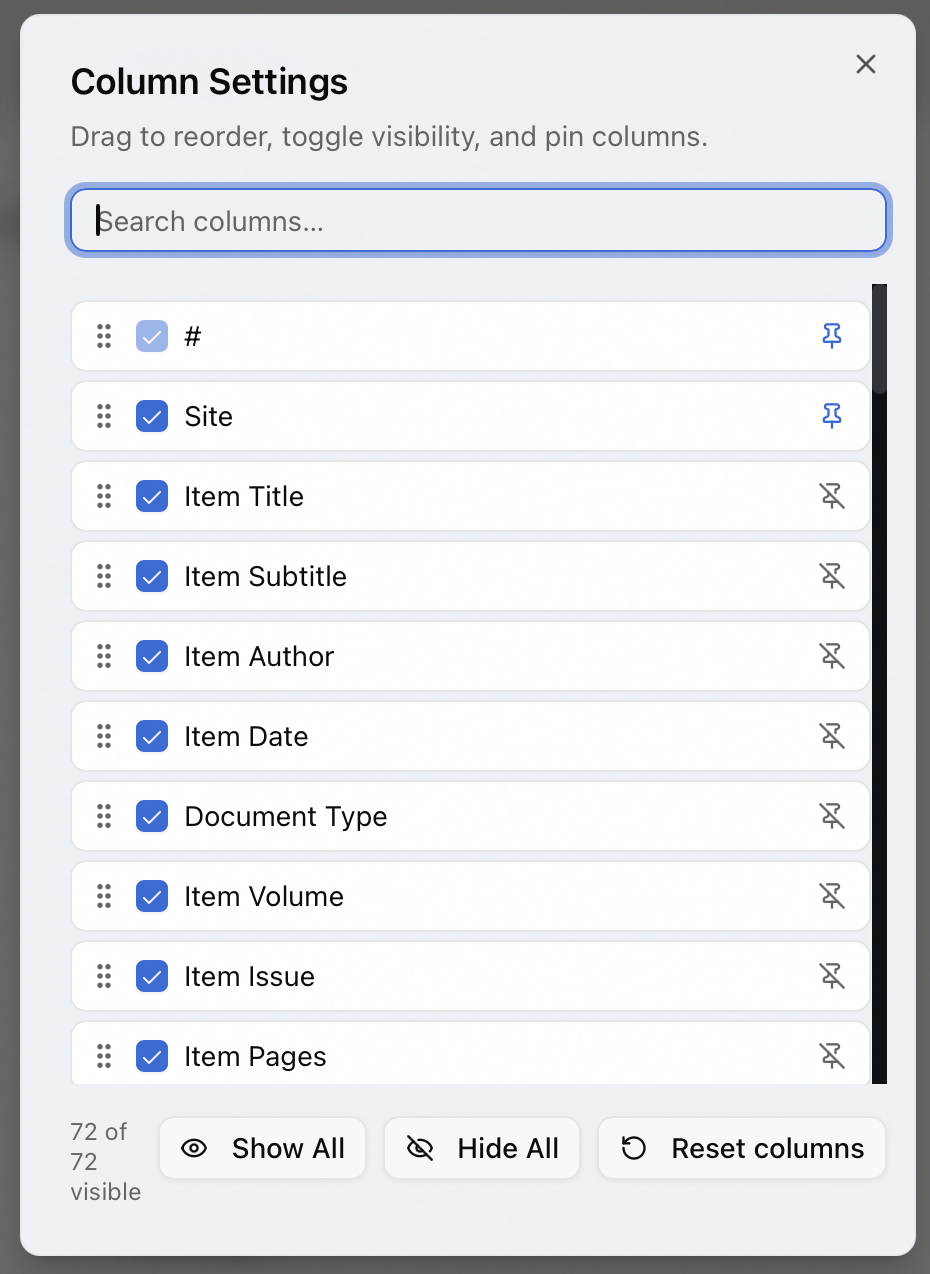
- Show or hide columns — click the Columns button to open the Column Settings panel, where you search for a column, drag to reorder, toggle each column's visibility, and pin columns. Show All, Hide All, and Reset columns sit at the bottom.
- A key column stays put — the identifier column (the request number, username, or name, depending on the list) stays pinned in place as you scroll sideways across the wider fields, so you never lose track of which row is which.
Your custom fields, as columns and filters
The custom request and user fields your institution has configured appear as their own grid columns, labeled with the names you've given them. The data you track sits right alongside the built-in fields — there's nothing extra to turn on.
You can also filter by them: your custom fields appear in the filter controls under those same labels, so you can narrow a list by one of your own fields — for example, filtering the Activities list (or a request queue) by an activity's custom info field such as a research division or site location. Existing field-level restrictions still apply, so a field a role can't see isn't offered as a filter.
Narrowing the list
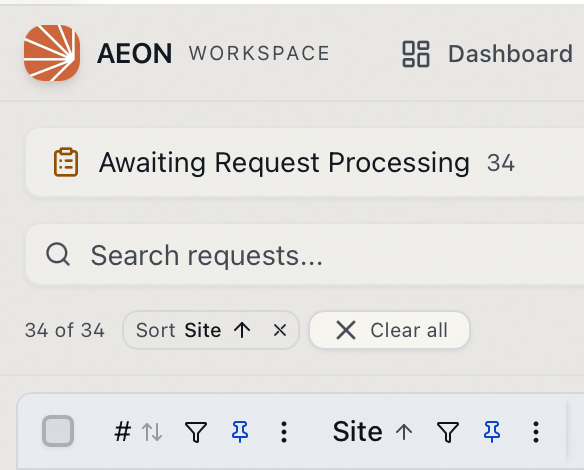
- Filter chips — the filters you've applied show up as chips above the list, so you can see at a glance what you're filtering on. Remove a single filter by clearing its chip, or use Clear all to drop every filter at once.
- Continuous scroll — results load smoothly as you scroll, even across large sets, so there are no pages to click through.
Saving a View
A View bundles together a column layout, a sort order, and a set of filters under a name you choose. Once you've arranged a list the way you like it, open the Views menu and choose Save current as new view…, give it a name, and it's yours to return to anytime.
The same menu lists your saved Views. For the one you're using, you can Save changes to it, Rename… it, Share… it (see below), or delete it with the trash icon on its row. When you've changed a View's layout without saving, Aeon flags the unsaved changes; Reset to default returns the list to the standard layout.
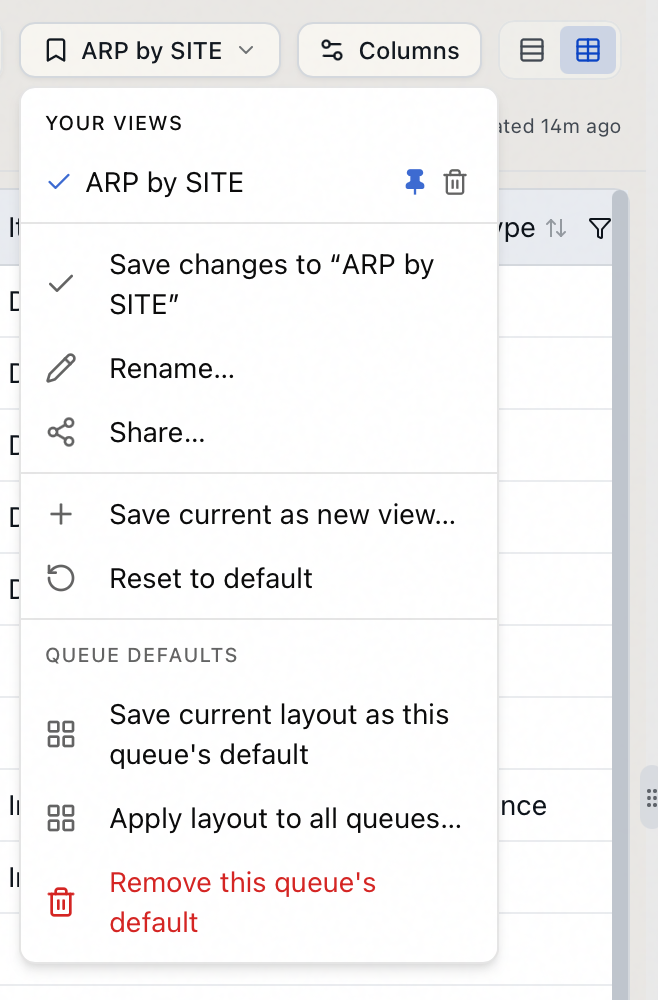
Saved Views are personal — each staff member keeps their own set. Creating, renaming, and deleting them needs no special permission beyond access to the list itself.
Sharing a View
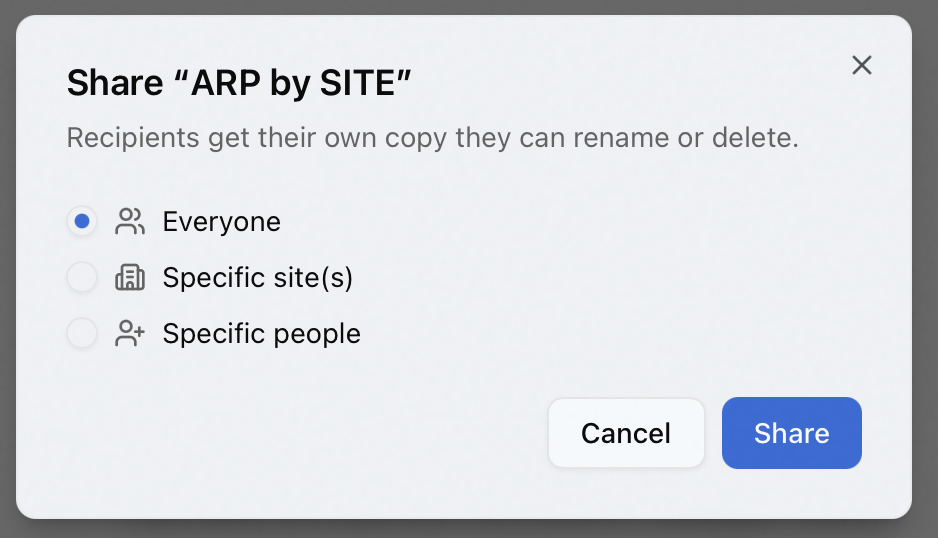
You can send a View to colleagues so they don't have to rebuild it. Choose Share… from the Views menu and pick who receives it — Everyone, Specific site(s), or Specific people you name. As the dialog says, "Recipients get their own copy they can rename or delete."
Each recipient gets their own independent copy of the View. They can rename or tweak it however they like without affecting yours, and a change you make later won't reach back into their copy. If someone already has an identical View, Aeon skips the duplicate rather than piling on copies; if only the name collides, the new copy is given a "(copy)" suffix.
Pinning a View to a queue
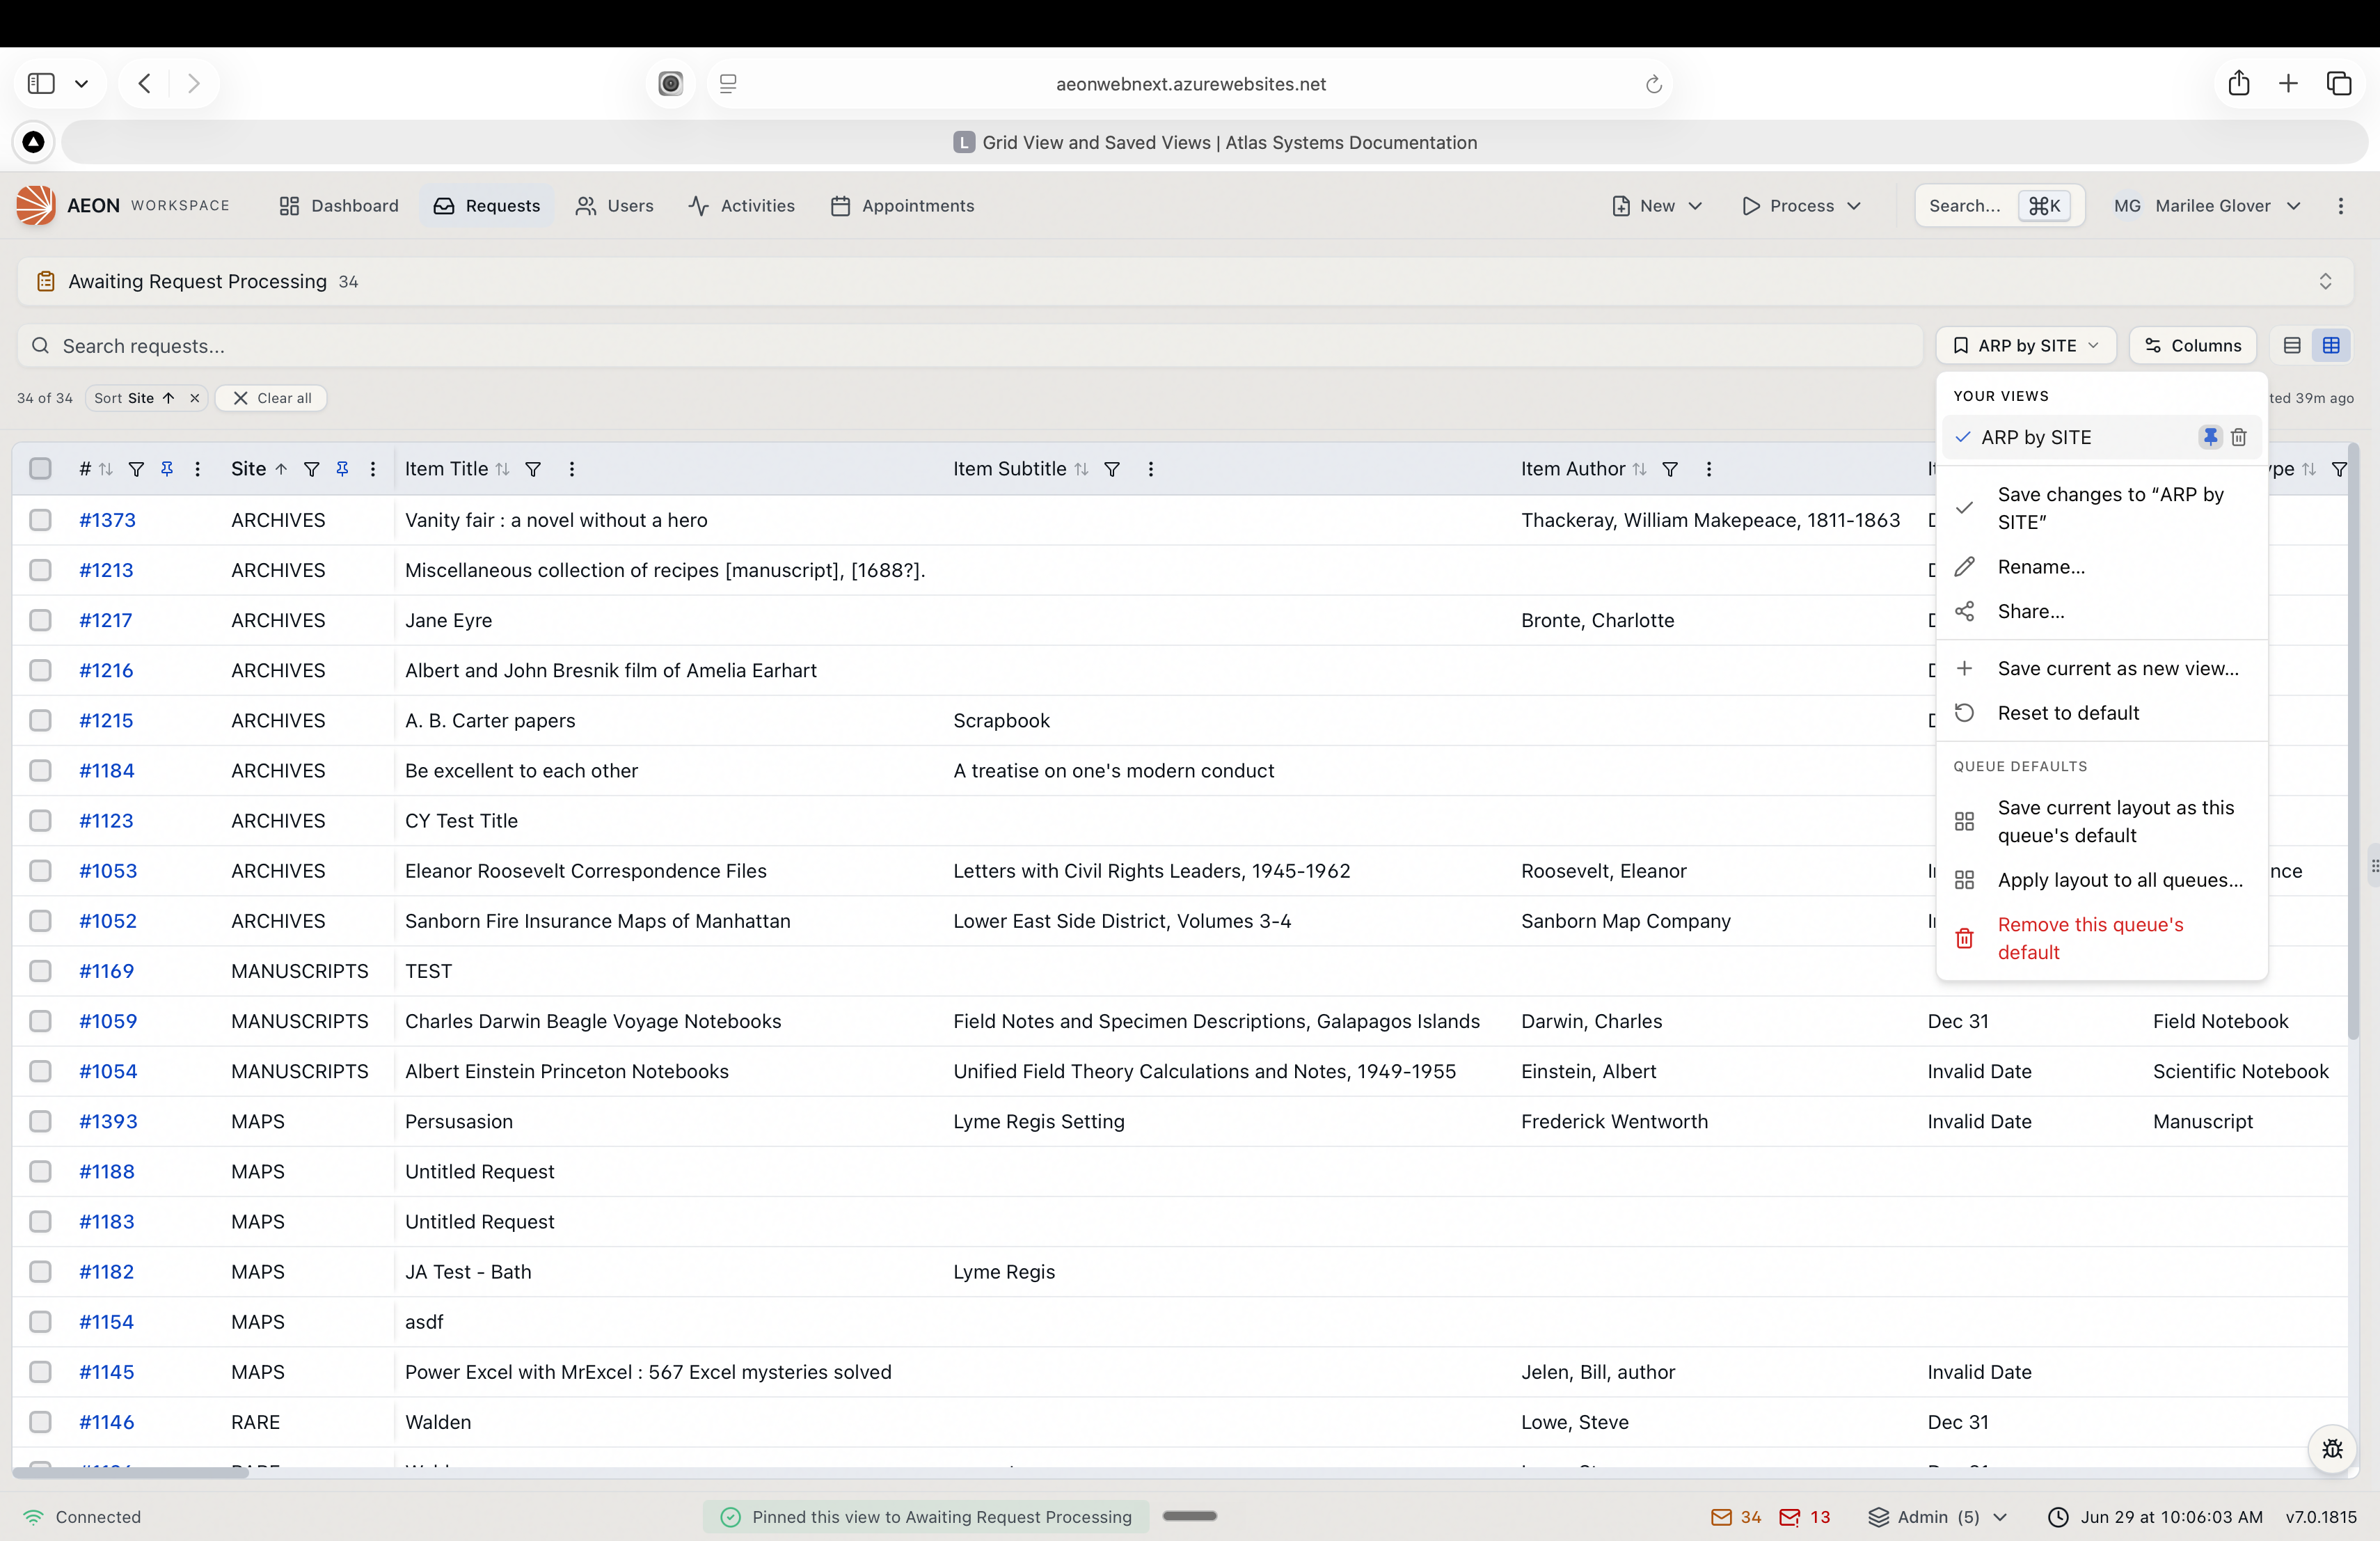
Inside a queue, the Views menu lets you pin one of your saved Views to that queue — click the pin icon on the View's row. Once pinned, that View loads automatically every time you open the queue — no setting it up each visit. Aeon confirms with "Pinned this view to {queue name}" in the status bar.
Pins are personal to you: pinning a View to a queue changes only what you see there, not your colleagues. Unpin just as easily from the same menu ("Unpinned from {queue name}"), and the queue goes back to its normal layout.
Team default layouts (administrators)
With designer access, you can set the layout a queue starts from for everyone — the columns, sort order, and filters staff see before they apply any View of their own. From a queue's Views menu:
- Save current layout as this queue's default — makes the layout you're looking at the queue's team default.
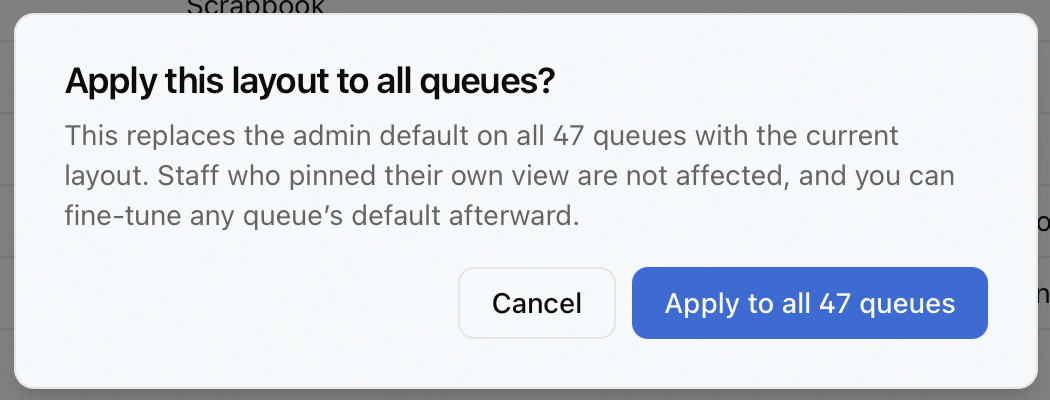
- Apply layout to all queues… — applies the current layout as the default to every queue at once. Aeon asks you to confirm first — "Apply this layout to all queues?" — and explains that it "replaces the admin default on all {N} queues with the current layout. Staff who pinned their own view are not affected, and you can fine-tune any queue's default afterward." Confirm with Apply to all {N} queues.
- Remove this queue's default — clears the team default for the queue.
Aeon confirms each action in the status bar (for example, "Saved the default layout for {queue name}" or "Applied this layout as the default to {N} queues"). Setting a team default never overrides a staff member who has pinned their own View — individual pins always win for that person.
- Saving, sharing, and pinning your own Views needs no special permission beyond the access you already have to the list — every staff member manages their own Views, and you can only pin Views you own.
- Setting a queue's default layout (and applying one across all queues) requires designer access — the Designers configuration capability. Staff without it still see and use team defaults; they just can't set them.